How to Install the Kartboy Solid Shifter Joint — 6-Speed STI
This guide covers installing the Kartboy Solid Shifter Joint on a 6-speed STI. This install is done on a 2004 STI but applies to all 6-speed STI applications. If you don't have the full suite of Kartboy shifter components already in your car, It's night and day easier to do it all at once. Whether you have the setup already or stock components, this guide shows you how to swap just the joint regardless of what you currently have.
Parts in This Install
- Kartboy 6-Speed Solid Shifter Joint
New hardware is included with the kit. Don't throw it away.
Install Time
1–2 hours depending on rust and access.
Difficulty
Intermediate
Tools You'll Need
- 12mm wrench and socket
- 14mm wrench (open-end, not ratcheting — you'll need it for a through-bolt with a weld nut)
- 17mm socket
- 3mm Allen key
- A hammer like object - an actual hammer is recommended.
- Company23 Axle Pin Punch Tool (highly recommended — Subaru uses a double roll pin design and this tool makes the job far easier)
- Additional punches if you do not have access to the Company23 Axle Pin Punch Tool
- Automotive grease
Before You Start — Put the Car in Second Gear
Do it before you touch anything else. It'll make your life easier.
Second gear positions the roll pin on the clevis and transmission selector at exactly the right spot for the first part of this guide.
Step 1 — Remove the Transmission Mount Bracket
Get under the car. The U-joint is up in there, and you won't have good access until the transmission mount bracket is out of the way.
The bracket comes off with: two 17mm bolts at the front, four 14mm bolts at the rear, and two 14mm nuts.

On most cars you won't need to support the transmission or engine — nothing sags dramatically with this bracket out. Your mileage may vary, but on a stock-ish setup you'll probably be fine.
If you have an aftermarket catted down pipe, you may need to unbolt the front and rear sections to get enough movement to extract the bracket. If you have a GD with a stock or similar down pipe, this is also a good time to install the Kartboy polyurethane transmission mount bushing. We'll cover that in a future video.

Step 2 — Drop the Lower Shift Rod
With the bracket out, locate the front shifter bushing and remove the 14mm through-bolt. This is a through-bolt with a weld nut on the back — your ratcheting wrench won't fit it, so use a standard open-end.

Reverse lockout cable trick: Before pulling that bolt, there's a spring-loaded reverse lockout cable arm right there. When the bolt comes out, that spring tension will try to walk the mounting plate around on you. To prevent that, grab a 3mm Allen key and drop it into the two small holes in the plate. It'll preload the spring and keep the plate from flopping around while you work. Pull the Allen key out during reassembly.
Once the bolt is out, drop the lower shifter rod down and out of the way. This opens up a clear shot at the roll pin.

Step 3 — Loosen the Rear U-Joint Bolt
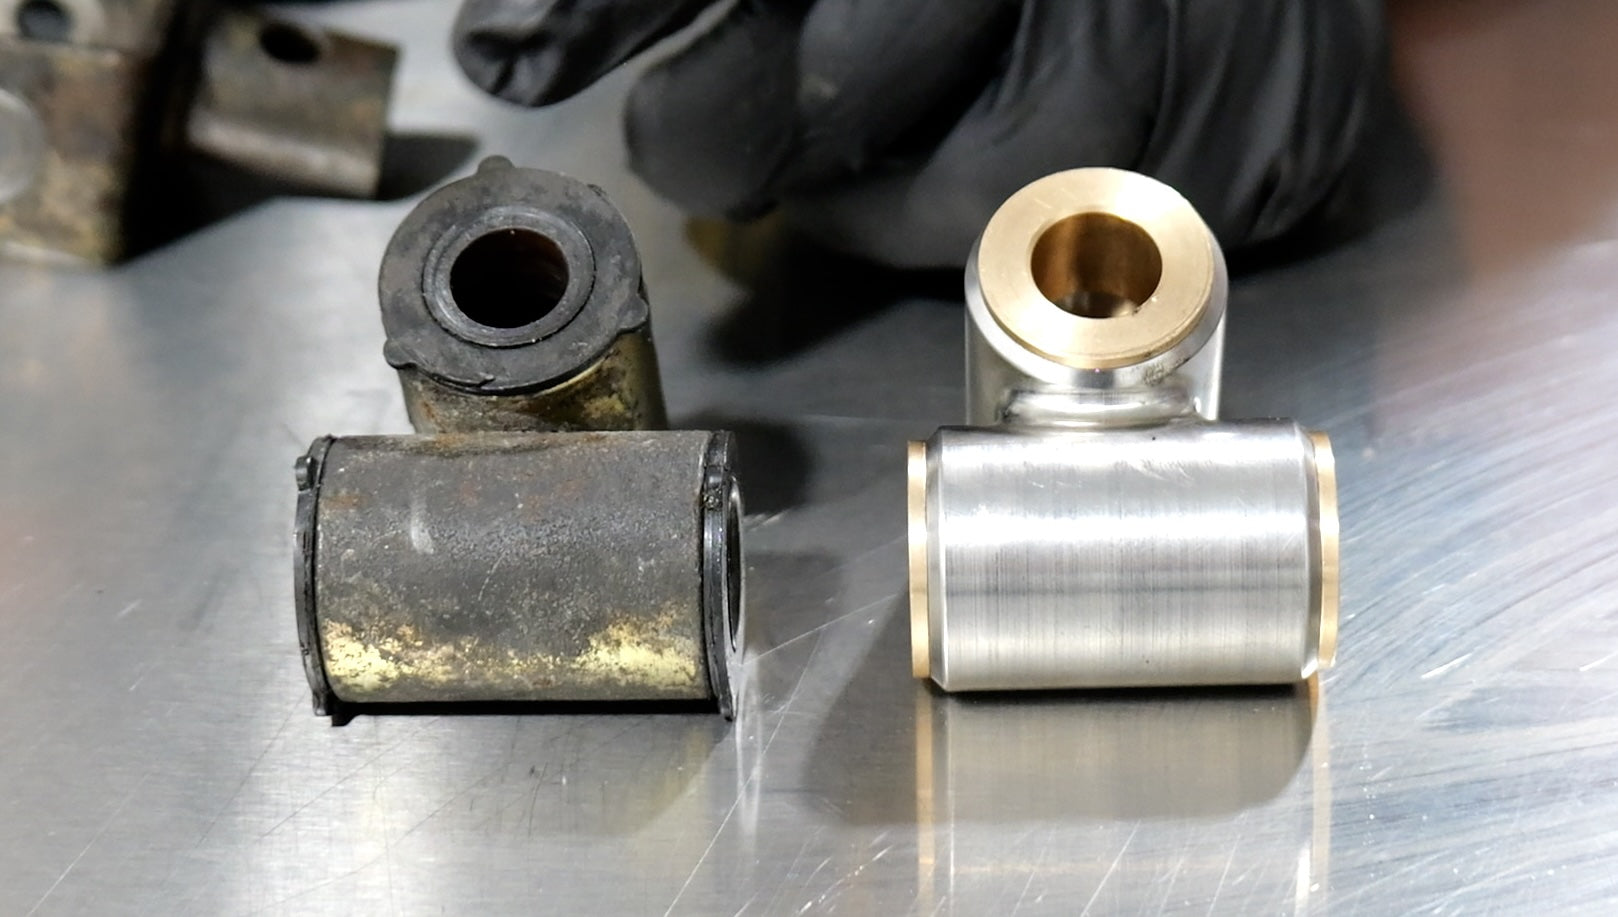
Here's a visual of the shift joint you will be replacing with the Kartboy version

Heads-up before you reach up there: the rear bolt on the U-joint doesn't have a conventional bolt head. What's on top is a fastener with two flats, not hex. You'll need a 14mm open-end wrench to grab it.


Get it loose but don't try to remove it yet. You physically can't pull it straight out in the current configuration because it hits the top of the transmission tunnel. Leave it finger-tight for now.
Step 4 — Drive Out the Roll Pin
The Company23 Axle Pin Punch Tool earns its keep here. Subaru uses a double roll pin setup — an inner pin inside an outer pin — and this tool seats inside the inner one and drives both simultaneously. It's also long enough to give you a solid target to hammer.

With the lower shift rod out of the way and the car in second gear, you should have about as straight a shot as you're going to get. Put the tool on the pin, give it a few hammer hits, and it should drop right out.
Step 5 — Disconnect the Upper Shifter Inside the Car
Go inside. Depending on year, GDs are easy. The center console just pops apart with no tools. Pull the shifter trim surround, unbutton the shift boot, and remove the Kartboy (or factory) shift knob.


The bolt you're after is the 12mm pivot bolt that connects the upper shifter rod to the short shifter. Remove it. The shifter will go loose and floppy. Now you can head back under the car to extract the joint.
Step 6 — Remove the Old Joint
With the upper pivot bolt out, you can now slide the joint back off the transmission selector, drop it down, push the rear bolt out from the top, and extract the whole assembly. The joint, crush tube, and bolt all come out together.

Step 7 — Bench Work
Reuse the clevis
The only part from the factory assembly you're reusing is the clevis. Clean it up before it goes back in.

Grease — do this on the bench
Pack grease into the crush tube area and through the bushings. Cycle the joint a few times. There's a small gap between the bushings in the center where grease pools — that's by design. The bushings are self-lubricating, but more lube on moving metal parts is never a mistake.


Grease the inside of the clevis ears. Grease the bolts too — especially if you live somewhere that sees salt and snow.

Orient the joint correctly before you install it: The Kartboy logo faces down toward the ground when installed, with the text toward the front of the car. The joint body is offset in a couple directions, so orientation matters. Get it right now, not when you're under the car.

Assemble the clevis and joint on the bench
Thread the 12mm bolt through from the top, thread on the 13mm nut. Snug it down — don't torque it fully yet. You'll do that once it's in the car.
Step 8 — Install the New Joint
Grease anything may need it under the car, note the ears below where the shift joint will be installing as an example.

Shift the transmission by hand into first gear to gain a little extra clearance for maneuvering the joint into position. Once it's seated, shift back to second gear to align the roll pin holes.
Thread the joint up and onto the transmission selector. Get the rear bolt loosely started. Don't tighten the nut until the roll pin is seated.


Drive the roll pin home. The goal is to get it flush as you can. The Company23 tool makes this straightforward.

Once the pin is in, tighten the rear bolt: 12mm on top, 13mm on the nut. Crank it down — the crush tube design means the bolt can be fully torqued without binding the joint. You should still be able to move the joint freely by hand after it's tight. No play, no binding. That's the point.

Step 9 — Reinstall the Front Shifter Bushing
With the joint in place, reinstall the lower shift rod and get the 14mm front bushing bolt back in.

There's a tab/tang on the reverse cable mounting plate that needs to find its home on the bracket before you run the bolt down. Take a second to confirm it's seated correctly.

Step 10 — Reinstall the Transmission Mount Bracket
Bring the bracket back up. Get all the hardware started before you begin tightening — front 17mm bolts, rear 14mm bolts, and the 14mm nuts at the transmission mount. Tighten in sequence.
![]()
Step 11 — Finish Up Inside
Back inside the car. Reconnect the upper shifter pivot bolt (12mm). The shift knob should feel noticeably more direct the moment you put it back on. Reinstall the shift boot, trim surround, and console.
Feel the Difference
Put it in second, third, fourth. That vagueness is gone. It should feel like a different car.
- Kartboy 6-Speed Solid Shifter Joint
Questions? Email support@kartboy.com — the team will get back to you.
Watch the full install on the Kartboy YouTube channel.
Share:
How to Install the Kartboy 5 speed Solid Shifter Joint and 5-Speed Clevis